The Prina 50 Pack Drawing Set is a fantastic option for anyone interested in drawing, whether you’re just starting or have been sketching for years. This set includes everything you need to get started, making it a great value for its price.
With a 4.8-star rating from nearly 3,000 reviews, it’s clear that this kit is a favorite among users. Let’s dive into what makes this drawing set stand out.
I recently bought this kit for a beginner’s art class and was impressed by the wide range of supplies included. My instructor was also pleased with the variety, noting that it had everything a new artist would need.
I’ve been using the set for two months and still have many items left to try. The different pencils and charcoal sticks are great for experimenting with shading and toning, making it an excellent choice for anyone looking to improve their drawing skills.
This sketch kit provides a wide range of tools for drawing and sketching. It includes 15 graphite pencils with different hardness levels, black and white charcoal pencils, blending tools, and even a sandpaper block. The variety ensures that both beginners and experienced artists have everything they need to create detailed and shaded drawings.
Premium Drawing Set with Unique 3-Color Sketchbook
The kit includes a unique sketchbook with three types of paper: white, tan, and black. This allows artists to experiment with different backgrounds and styles without needing multiple sketchbooks. The sketchbook’s 50 pages are suitable for various drawing techniques, making it a versatile addition to the set.
This set stands out by including a step-by-step tutorial on how to draw a dog. This is especially helpful for beginners who are just starting to explore the world of art. The tutorial guides users through the basics of shading and sketching, making it easier to create impressive artwork from the start.
The pencils in this set are made from non-toxic and eco-friendly materials, meeting strict ASTM and EN71 standards. The lead cores are smooth, durable, and resistant to breaking, which makes sharpening and erasing easy. These features make the set ideal for detailed illustrations, shading, and layering.
The set comes with a travel-friendly case that keeps all the art tools organized and protected. This makes it easy to take the kit anywhere, allowing artists to work on their projects while traveling. The case ensures that everything stays in place, making it convenient for artists of all levels.
Whether you’re a beginner, a hobbyist, or an experienced artist, this sketch kit has something to offer. It includes a wide range of tools and materials that cater to different skill levels and artistic styles. This makes it a versatile choice for anyone looking to improve their drawing skills.
This sketch kit makes a wonderful gift for birthdays, holidays, or any special occasion. Its comprehensive selection of drawing tools and materials is sure to delight any aspiring artist. The quality and variety of the items make it a thoughtful and practical present.
Users have praised the sketch kit for its completeness and quality. Many reviewers have highlighted how the set provides excellent value for money. The included sketchbook and variety of pencils have been particularly well-received, making it a popular choice among artists.
Room for Improvement
While the sketch kit is highly rated, some users have noted areas for improvement. Issues like the durability of the case and the quality of the knife for sharpening pencils have been mentioned. Addressing these concerns could make the product even better.
Affordable and Budget-Friendly
One of the standout features of this sketch kit is its affordability. Priced at just $25.99, it offers a comprehensive set of drawing tools without breaking the bank. This makes it an excellent option for those on a budget who still want high-quality art supplies.
KALOUR Watercolor Pencils offer artists of all levels a versatile tool for their creative projects. This set includes 72 pencils with a wide range of colors, making it easy to find the perfect shade for any artwork.
Whether you prefer drawing or coloring, these pencils can be used both wet and dry. Just add a bit of water to see the colors spread and create beautiful watercolor effects. The pencils are non-toxic and safe for both kids and adults.
Users have praised these pencils for their smooth blending and intense colors. One reviewer mentioned that they compared well to more expensive brands, offering excellent value for money.
Another user highlighted the vibrant colors and ease of use, noting that people of all ages enjoyed using them. The set’s packaging also makes it easy to keep the pencils organized and protected.
These watercolor pencils are great for both wet and dry drawing. You can create sharp lines and bright colors just like regular colored pencils. When you add a bit of water with a brush, the color spreads out, creating a cool watercolor effect. This makes them ideal for various art projects.
The set includes 72 pencils that cover a full range of colors. Each pencil is named and numbered, making it easy to find the right shade. The pencils have soft cores that don’t break easily and are perfect for blending, shading, and layering. This makes them a great choice for artists and art lovers.
These pencils are designed to be safe and eco-friendly. They have a hexagonal shape that is comfortable to hold, and are made from high-quality wood and non-toxic pigments. Both kids and adults can use them safely. The pencils meet all safety standards, so you can use them with peace of mind.
The pencils come in a nice tin box with three plastic trays to keep them safe from damage. This makes it easy to take them with you when you travel or go out. You can create art wherever you are, making your drawing experience even more enjoyable.
These watercolor pencils are a great gift for kids aged 5 and up. They are non-toxic and safe, conforming to ASTM D-4236 and EN71-3 standards. If you have any problems with the pencils, the company promises to make it right. This makes them a wonderful present for young artists.
Customers love these pencils for their smooth blending and bright colors. Many compare them favorably to more expensive brands. Users appreciate the wide range of colors and the ease of organizing them in the provided packaging. Overall, they are seen as a great value for the price.
Great for All Ages
These pencils are enjoyed by people of all ages, from kids to adults. They are easy to use and produce great results, making them a versatile tool for any artist. Whether you are just starting out or have been drawing for years, these pencils are a wonderful addition to your art supplies.
Affordable Quality
These watercolor pencils offer excellent quality at an affordable price. Users find that the colors are intense and work well when wet. They are perfect for those who want to try watercolor pencils without spending a lot of money. This makes them a smart choice for budget-conscious artists.
Vibrant Colors
The colors in this set are vibrant and rich, making your artwork stand out. Even after using them for a long time, users find the colors remain bright and beautiful. This makes the pencils a reliable choice for creating stunning art pieces.
Convenient Packaging
The packaging of these pencils is designed to keep them organized and safe. The tin box and plastic trays make it easy to find the color you need and protect the pencils from damage. This adds to the overall convenience and usability of the set.
Photography is the art and practice of capturing images using light. It involves recording pictures of objects, people, or scenes by allowing light to fall onto a light-sensitive surface, such as film or a digital sensor, in a camera. The word “photography” comes from the Greek words “photo” (light) and “graphy” (drawing), meaning “drawing with light.”
What Is Composition In Photography?
Composition in photography refers to how the elements within a photograph are arranged or organized. It’s the way you position subjects, objects, and other visual elements to create a balanced and aesthetically pleasing image. Good composition helps guide the viewer’s eye and enhances the overall impact of the photo.
3 Basic Composition Of Photography :
Rule OF 3rd:
The Rule of Thirds is a simple guideline in photography that helps you create more interesting and balanced pictures.
Imagine your photo is divided into a grid with two horizontal and two vertical lines, making nine equal parts (like a tic-tac-toe board). The key idea is to place the most important parts of your photo (the subject) along these lines or at the points where the lines cross.
This helps make your photo feel more natural and well-composed instead of having the subject always in the center. For example, if you’re taking a picture of a person, you might place their eyes on one of the intersections rather than in the middle of the frame.
Importance The Rule Of Third :
The Rule of Thirds is important in photography because it helps create more visually appealing and balanced images. Here’s why it matters:
Guides the Viewer’s Eye: Placing key elements off-center (along the grid lines) makes the image more dynamic and naturally leads the viewer’s eye to the subject.
Adds Balance and Harmony: Photos with subjects centered can sometimes feel static or boring. Using the Rule of Thirds helps create a more natural and pleasing balance.
Creates Depth and Interest: By moving the subject away from the center, you can make the image feel more dynamic, adding layers and interest to the composition.
Improves Storytelling: It allows more room in the frame for context, helping to tell a better story. For instance, in a landscape photo, placing the horizon along the bottom third emphasizes the sky, while placing it along the top third emphasizes the land.
In short, the Rule of Thirds helps you make more engaging and professional-looking photos with minimal effort.
Symmetry :
Symmetry In Photography :
Symmetry in photography is when both sides of an image mirror each other, either perfectly or nearly so. It means that the elements on one side of the picture are balanced and reflect the elements on the other side, creating a sense of harmony and balance.
Why Symmetry is Important:
Focus on the Product: Symmetry naturally draws attention to the product, making it the center of focus without distractions.
Creates a Professional Look: Symmetrical images give a sense of order and precision, which is ideal for showcasing products in a clean and polished way.
Easy on the Eyes: Symmetry is visually satisfying, making your product more appealing to potential buyers.
Highlights Details: For items like electronics, cosmetics, or fashion, symmetry helps emphasize the product’s shape, design, and craftsmanship.
Reflection In Photography :
Using reflection in photography can create stunning, creative effects by mirroring the subject in water, glass, or other reflective surfaces. It adds depth and dimension to a photo, often resulting in visually striking compositions.
Importance of Using Reflection in Photography:
Adds Visual Interest: Reflections make a photo more captivating by introducing a secondary version of the subject. This can make the image feel more dynamic and layered.
Creates Symmetry: Reflections often result in natural symmetry, which brings balance and harmony to the composition. This makes the image aesthetically pleasing.
Enhances Creativity: Reflections offer a chance to experiment with unique angles, creating abstract or surreal effects. This allows photographers to think outside the box and showcase the subject in a fresh way.
Boosts Depth and Dimension: Reflections can give a photo a three-dimensional feel, especially when reflected in water or mirrors, adding a sense of depth.
“The creative expression of human imagination and skill, typically manifested through various forms such as visual, auditory, or performing arts, to evoke emotions, provoke thought, and communicate ideas, experiences, or concepts.”
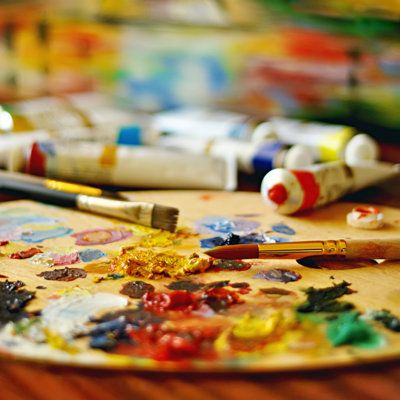
Basic Tools And Materials :
Starting with watercolor drawing involves a few essential tools and materials. Here’s a basic list to get you started:
Watercolor Paints: Choose a set of watercolor paints. Beginners often start with a basic set of 12 to 24 colors. Watercolors come in tubes or pans; pans are convenient for portability and ease of use, while tubes offer more pigment.
Watercolor Paper: Use paper specifically designed for watercolors. It should be heavy-weight (typically 190 lb or 300 gsm) to handle water without warping. Watercolor paper is usually available in various textures (cold-pressed, hot-pressed, rough) that affect the final look of your painting.
Brushes: Invest in a few good watercolor brushes. A basic set might include:
Round Brush: Versatile for detailed work and washes.
Flat Brush: Useful for broad strokes and washes.
Detail Brush: For fine lines and intricate details. Synthetic brushes are generally more affordable and durable for beginners, but natural hair brushes (like sable) offer a different experience.
Palette: A watercolor palette is used to mix paints and create custom colors. It can be a simple plastic palette with wells or a ceramic or glass one.
Water Containers: Have at least two containers for water—one for rinsing your brushes and one for clean water to mix with your paints.
Paper Towels or Sponges: These are essential for blotting excess water and paint, controlling the paint’s intensity, and cleaning brushes.
Pencil: A light graphite pencil is useful for sketching your initial design before painting. Use a pencil that won’t be too visible through the watercolor.
Eraser: A kneaded or precision eraser to correct any pencil lines without damaging the paper.
Masking Tape or Fluid: Masking tape can be used to create clean edges or protect areas of the paper. Masking fluid can be applied to areas you want to keep white or untouched by paint.
Ruler: Useful for drawing straight lines or measuring areas, though not always necessary for every project.
Tips for Beginners:
Experiment with Color: Try different colors and combinations to see how they mix and blend on the paper.
Practice Control: Experiment with varying amounts of water to see how it affects the intensity and flow of the paint.
Work Quickly: Watercolor paint dries fast, so work efficiently and be prepared to adjust as needed.
Watercolor Paper: Preferably 190 lb (300 gsm) or heavier.
Brushes: A round brush and/or flat brush.
Water: For mixing with paints.
Palette: For mixing colors.
Paper Towels: For blotting and cleaning.
Steps:
Prepare Your Paper:
Make sure your watercolor paper is dry. Unlike the wet-on-wet technique, the wet-on-dry technique involves applying paint to dry paper.
Mix Your Paint:
On your palette, mix the watercolor paints with water to achieve the desired consistency. The paint should be fluid but not overly watery.
Apply the Paint:
Dip your brush into the mixed paint and apply it directly onto the dry paper. The paint will not spread as much as it would in the wet-on-wet technique, giving you more control over the edges and details.
Control the Edges:
With the wet-on-dry technique, you can create crisp edges and well-defined shapes. This is particularly useful for detailed areas or where you want to maintain clear lines and boundaries.
Layering:
Allow the first layer of paint to dry before applying additional layers. This layering technique allows you to build up color gradually and achieve depth and richness in your painting.
Blending and Adjusting:
If you need to blend colors or make adjustments, you can use a clean, wet brush to soften the edges or blend colors together. Be cautious not to overwork the paper, as too much water can cause it to become saturated and warp.
Final Touches:
Once your painting is completely dry, you can add final details or touches. Use a fine brush for any additional details or adjustments.
Uses:
Detailed Work: Ideal for painting detailed subjects like flowers, portraits, or architectural elements.
Defined Shapes: Good for creating clear shapes and lines.
Layered Effects: Useful for building up layers of color and achieving depth.
The wet-on-dry technique is a fundamental skill in watercolor painting that offers precision and control, making it a great starting point for beginners and a valuable technique for experienced artists.
Developing a daily watercolor painting practice as a beginner is a fantastic way to improve your skills and build confidence with the medium. Here’s a step-by-step guide tailored for beginners:
Create a Dedicated Area: Set up a specific spot for painting that is well-lit and comfortable. This could be a table or desk where you can leave your materials set up.
Organize Supplies: Keep your watercolor paints, brushes, paper, and other tools organized and within easy reach.
2. Establish a Routine
Pick a Time: Choose a consistent time each day to paint. It could be in the morning, during a lunch break, or in the evening—whatever fits your schedule best.
Start Small: Begin with short sessions, such as 15-30 minutes. As you get more comfortable, you can gradually extend the time.
3. Start with Simple Projects
Daily Sketches: Begin by sketching simple subjects like fruits, flowers, or everyday objects. This helps you focus on basic techniques without feeling overwhelmed.
Color Swatches: Create color swatches or simple color charts to understand how different colors mix and interact.
4. Focus on Basic Techniques
Practice Basic Strokes: Experiment with basic watercolor techniques such as washes, gradients, and wet-on-dry vs. wet-on-wet. Practice these techniques individually to understand their effects.
Texture Experiments: Try different methods for creating texture, such as dry brushing, salt effects, or sponging.
5. Keep a Sketchbook or Journal
Document Your Progress: Use a sketchbook to keep track of your daily work. Include notes on techniques, colors, and what you’ve learned each day.
Reflect: Periodically review your sketchbook to see your progress and identify areas where you’d like to improve.
6. Seek Inspiration
Reference Images: Use reference images from books, online sources, or your surroundings to practice different subjects and compositions.
Art Challenges: Participate in online art challenges or prompts to keep your practice varied and engaging.
7. Set Goals
Short-Term Goals: Set achievable goals for each week or month, such as mastering a specific technique or completing a series of small paintings.
Long-Term Goals: Consider setting broader goals, such as creating a full painting or learning about a specific style or artist.
8. Learn and Adjust
Watch Tutorials: Watch beginner-friendly watercolor tutorials online to learn new techniques and gain different perspectives.
Adjust Your Practice: If you find certain techniques or subjects challenging, adjust your practice to focus on those areas.
9. Connect with Others
Join Communities: Engage with watercolor communities online or locally to share your work, get feedback, and find encouragement.
Art Buddies: Find a friend or fellow artist to share your daily practice with. This can provide additional motivation and support.
10. Enjoy the Process
Have Fun: Focus on the joy of creating rather than perfection. Each painting, even if it doesn’t turn out as expected, is a valuable learning experience.
Celebrate Progress: Celebrate your achievements, no matter how small. Recognize improvements in your skills and techniques.
Sample Daily Routine for Beginners:
Warm-Up (5 minutes):
Quick sketch or color swatch practice to loosen up.
Main Practice (15-20 minutes):
Work on a simple subject or technique. Focus on one aspect of watercolor each day (e.g., gradients, textures).
Review and Reflect (5 minutes):
Look at your work, make notes on what you learned, and think about what you’d like to try next.
By following this structured approach, you’ll develop a solid foundation in watercolor painting and steadily improve your skills.
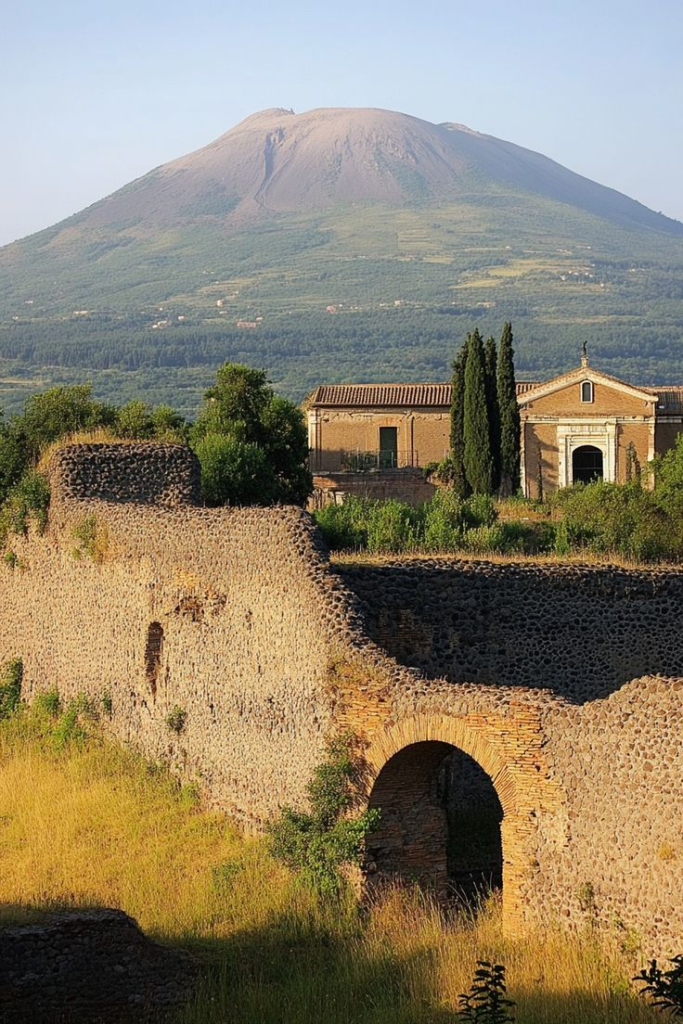
Welcome to a journey back in time to the ancient city of Pompeii, a remarkable window into life in the Roman Empire. Nestled at the foot of Mount Vesuvius in Italy, Pompeii was a bustling metropolis until its catastrophic destruction by a volcanic eruption in 79 AD. Today, Pompeii stands as one of the most significant archaeological sites in the world, offering an extraordinary glimpse into daily life, culture, and architecture of ancient Rome. Join us as we explore the fascinating ruins and uncover the stories of its inhabitants, frozen in time by one of history’s most dramatic natural disasters.
Bodies Of Pompeii’s :
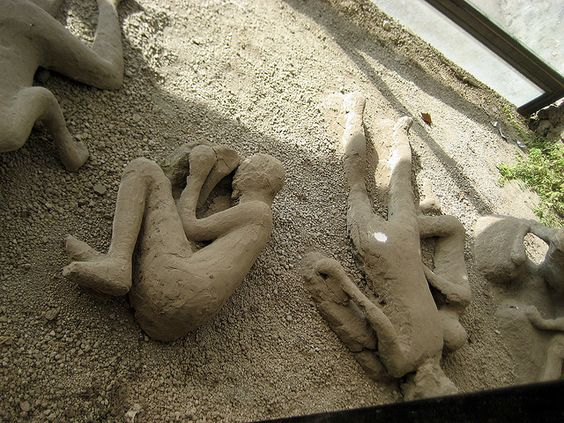
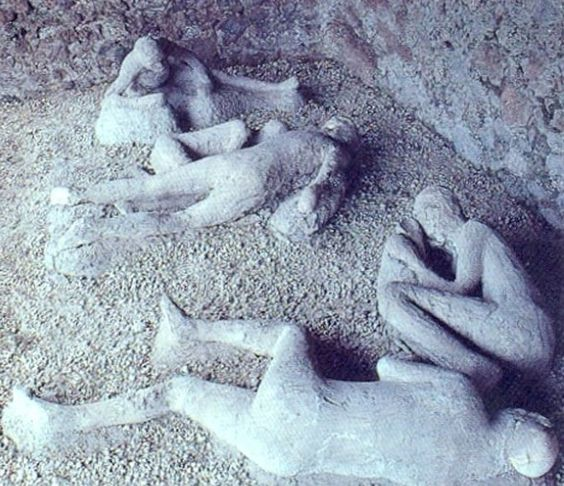
The bodies of Pompeii’s inhabitants, preserved by the catastrophic eruption of Mount Vesuvius in 79 AD, offer a poignant glimpse into the human side of this ancient disaster. As volcanic ash and pumice enveloped the city, the bodies of its residents were buried under layers of debris. Over time, the organic matter of these bodies decayed, leaving voids in the solidified ash. Archaeologists later discovered these voids and created plaster casts by filling them with plaster, capturing the exact shapes and postures of the victims. These casts reveal the dramatic final moments of the Pompeiians, showing them in their last actions, from seeking shelter to embracing loved ones. These haunting yet invaluable artifacts provide a deeply personal connection to the lives lost in the eruption, highlighting the sudden and tragic end of their lives.
The Eruption Of Mount Vesuvius :
The eruption of Mount Vesuvius in 79 AD was one of the most catastrophic volcanic events in recorded history. On August 24, Vesuvius unleashed a violent eruption that spewed a massive cloud of volcanic ash, pumice, and gases high into the atmosphere. The eruption lasted for about 18 hours, and the fallout covered the nearby Roman cities of Pompeii, Herculaneum, and several smaller towns in a thick blanket of ash and volcanic debris.
The intense heat and the falling ash led to the rapid burial of these cities, effectively preserving them under layers of material that would later provide a detailed snapshot of Roman life. In Pompeii, the ash and pumice trapped buildings, artifacts, and even the bodies of its residents, creating a unique archaeological site. The cities remained hidden until their rediscovery in the 18th century, and excavation continues to reveal insights into daily life in ancient Rome. The eruption of Vesuvius remains a powerful reminder of nature’s immense and unpredictable forces.
Life In Pompeii A Snapshot Of Roman Society :
Life in Pompeii offers a remarkable snapshot of Roman society, revealing the everyday activities, social structures, and cultural practices of ancient Rome. Before its destruction in 79 AD, Pompeii was a vibrant and diverse city, bustling with commerce, social interaction, and cultural expression.
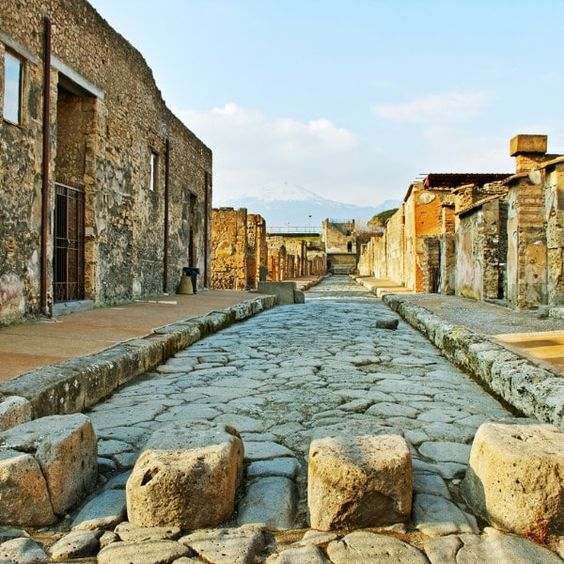
Urban Layout and Architecture:
Pompeii’s layout reflected the typical Roman city structure, featuring a grid of streets intersected by a forum at the center, where civic and commercial activities took place. The city was adorned with elaborate homes, public baths, temples, and amphitheaters. The well-preserved buildings, including the grand villas of the wealthy and the modest insulae (apartment blocks) of the common people, provide insights into architectural styles and living conditions.
Daily Life and Social Structure:
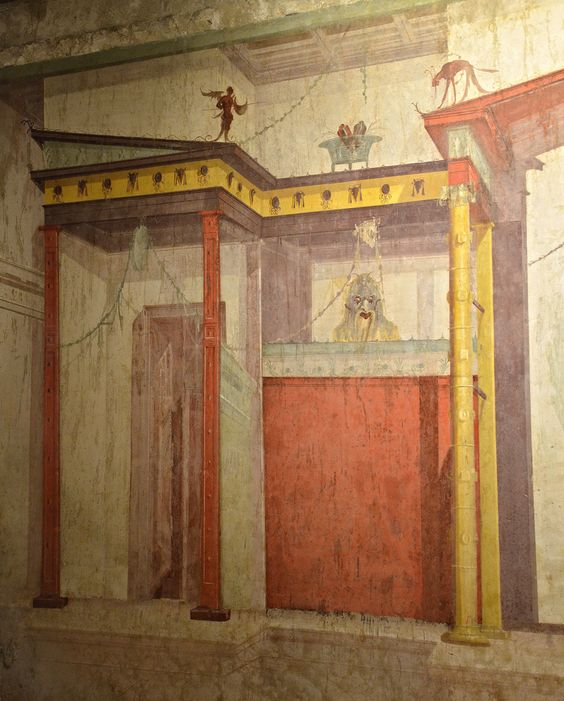
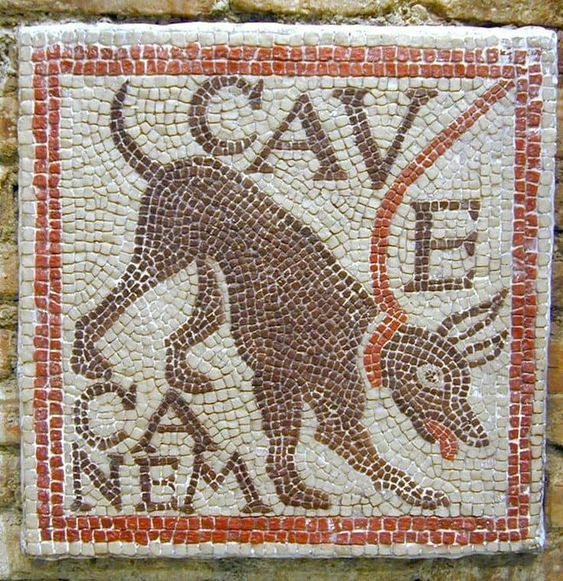
The city’s artifacts and frescoes depict a society rich in daily activities and social stratification. Wealthy citizens enjoyed luxurious homes with intricate mosaics and frescoes, while commoners lived in simpler dwellings. The remains of bakeries, taverns, and shops illustrate the bustling commercial life. Public baths, an integral part of Roman culture, served as social hubs for relaxation and interaction.
Art and Culture:
Pompeii’s art and decorations showcase Roman tastes and influences, from mythological frescoes to detailed mosaics. The city’s vibrant street life, with its bustling markets and lively forums, reflects the cultural and social dynamics of Roman society. Temples and public spaces highlight the importance of religion and civic pride.
Tragic Preservation:
The volcanic eruption preserved these aspects of daily life in extraordinary detail, capturing a moment frozen in time. The skeletal remains of Pompeii’s residents, along with plaster casts made from their voids in the ash, provide poignant evidence of the human side of the city’s tragic end.
Art And Culture In Pompeii :
Frescoes and Mosaics:
Pompeian homes were often decorated with intricate frescoes and mosaics. These artworks depicted mythological scenes, everyday life, and nature, showcasing both the wealth and artistic preferences of the inhabitants. Frescoes in villas like the House of the Vettii feature vibrant scenes of gods and goddesses, while mosaics, such as the famous “Alexander Mosaic,” capture historical and battle scenes with meticulous detail.
Public Art: The city’s public spaces, including temples and baths, were also richly decorated. Statues of gods, emperors, and mythological figures adorned these spaces, highlighting the importance of religion and civic pride in Roman society.
Cultural Hubs:
Pompeii’s amphitheater, theater, and forums were central to cultural life. The amphitheater hosted gladiatorial games and other spectacles, while the theater was a venue for dramatic performances and public gatherings.
The Human Side : Tragic Figures And Plaster Casts
Tragic Figures:
Pompeii Bodies ;
The eruption of Vesuvius buried Pompeii under a thick layer of volcanic ash and pumice, which rapidly solidified around the bodies of the city’s residents. The intense heat and ash caused many to perish suddenly. The discovery of skeletal remains, along with personal items like jewelry and clothing, provides a somber reminder of the human cost of the disaster.
Plaster Casts:
Archaeologists developed a technique to create plaster casts of the voids left in the ash where bodies had decomposed over the centuries. By pouring liquid plaster into these voids, they were able to capture the exact shapes and postures of the victims. These casts reveal the final moments of the individuals, preserving their expressions and positions, often in dramatic and distressing poses. The casts include a variety of figures, from families huddled together to individuals in the midst of their daily activities.
Emotional Impact:
These casts and remains evoke a powerful emotional response, offering a direct connection to the people of Pompeii. They portray the human suffering and panic experienced during the eruption, making the historical event feel intensely personal and real.
Pompeii Today: A UNISCO World Heritage Site
Today, Pompeii is a UNESCO World Heritage Site, recognized for its outstanding historical and cultural significance. The site, which was inscribed as a World Heritage Site in 1997, offers a unique and remarkably well-preserved snapshot of Roman life frozen in time by the eruption of Mount Vesuvius in 79 AD.
Preservation and Excavation:
Ongoing excavation and conservation efforts aim to protect and study the ancient city. The site covers approximately 66 hectares of the ancient city, revealing a complex urban layout, including homes, public buildings, and artifacts. Preservation challenges include dealing with the effects of weathering, tourism, and the delicate nature of the site’s structures and artworks.
Cultural and Educational Value: Pompeii provides invaluable insights into Roman urban planning, architecture, daily life, and social structures. The extensive ruins, including frescoes, mosaics, and plaster casts, serve as a crucial educational resource, attracting scholars, students, and tourists from around the world. The site offers a direct connection to the past, allowing visitors to experience the grandeur and intricacies of ancient Rome.
Tourism and Management: As a popular tourist destination, Pompeii faces the challenge of balancing visitor access with preservation needs. Efforts are made to ensure that tourism supports the site’s conservation while providing an enriching experience for visitors. Guided tours, educational programs, and digital reconstructions help enhance understanding and appreciation of the ancient city.
Temporality Of HumanExistence:
From an Islamic perspective, the story of Pompeii serves as a profound reminder of the transient nature of worldly life and the ultimate reality of divine decree. The sudden and catastrophic eruption of Mount Vesuvius, which buried the city in a matter of hours, underscores the unpredictability and power of Allah’s will.
In Islam, the fate of the people of Pompeii can be viewed through the lens of divine sovereignty and the temporality of human existence. It highlights the importance of reflecting on one’s life and deeds, recognizing that everything is under the control of Allah, and that life can change in an instant. The preservation of Pompeii offers us a tangible lesson about the impermanence of earthly achievements and the need to live a life of righteousness, mindfulness, and preparation for the hereafter.
The tragic end of Pompeii’s inhabitants also serves as a reminder to reflect on our own lives, strive for justice, compassion, and gratitude, and remain aware of the divine wisdom governing all events. In this way, the story of Pompeii can inspire introspection and a deeper understanding of the lessons that Allah imparts through history and natural events.
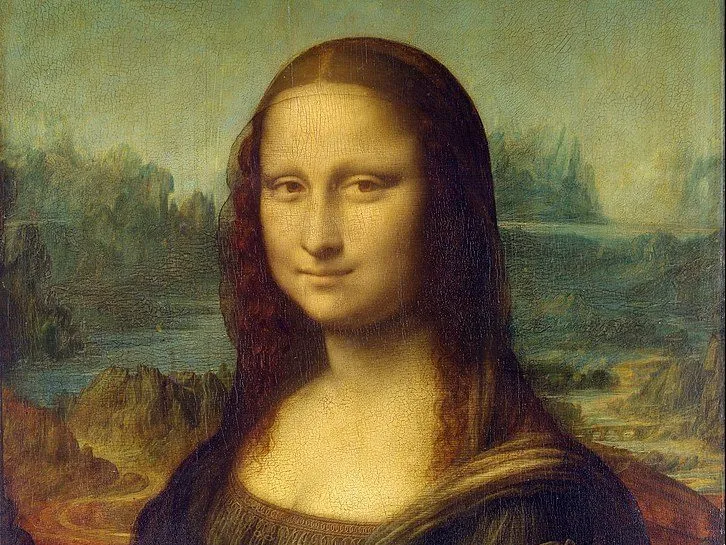
The Mona Lisa is believed to be a portrait of Lisa Gherardini, an Italian woman from Florence. She was the wife of a wealthy merchant named Francesco del Giocondo, which is why the painting is also known as “La Gioconda.” Leonardo da Vinci is thought to have painted her between 1503 and 1506. While some details about her life are known, much of her identity and the reason for her portrait remain subjects of speculation and intrigue.
The Mona Lisa :
The Mona Lisa is renowned for its artistic brilliance, especially for Leonardo da Vinci’s use of sfumato, a technique that gives the portrait a realistic appearance. The subject’s mysterious smile adds a layer of intrigue and has captured the attention of spectators for generations. Remaining one of the most recognizable and esteemed pieces of art in the world, it represents the pinnacle of Renaissance quality and cultural relevance.
The History of the Mona Lisa :
The Mona Lisa has a rich and fascinating history. Leonardo da Vinci began working on the portrait in 1503 and continued to refine it until his death in 1519. The identity of the sitter has been a subject of debate among art historians, with some suggesting that it is Lisa Gherardini, a woman from Florence. The painting remained in Leonardo’s possession until his death when it was acquired by King Francis I of France. Since then, it has been displayed in various locations, including the palaces of Francois I, Louis XIV, and Napoleon.
Subject
Lisa del Giocondo
Dimensions
77 cm × 53 cm
Created
1503
Genres
Portrait, portrait painting
Medium
Oil Painting
The Mona Lisa : Why She Is So famous :
Why mona lisa painting so famous? When the Mona Lisa was taken from the Louvre Museum in 1911, its notoriety skyrocketed. The painting received international attention as a result of this bold heist. Vincenzo Peruggia, an Italian handyman, was the burglar who took the painting from the museum after hiding it beneath his clothes. Due to the sensationalized theft, there was a protracted manhunt for the missing artwork. An interesting turn to the tale was the fleeting suspicion that famed artist Pablo Picasso was involved in the theft. When Peruggia tried to sell the artwork to a Florence art dealer in 1913, it was eventually found. Increased security measures were implemented for the painting after it was stolen, including the installation of bulletproof glass to protect it from further incidents.
The Mona Lisa’s Value and Protection
Among the most valuable paintings in the entire world is the Mona Lisa.It was worth $100 million in 1962, which is at least $870 million in modern currency. The painting’s tremendous value stems from its cultural and historical significance in addition to its artistic merit. The painting is housed in a bulletproof glass container that is climate-controlled to protect it from theft and vandalism. This precautionary method keeps the painting protected while enabling visitors to view and enjoy it.
Recent Discoveries About the Mona Lisa
In recent years, scientific studies have shed new light on the Mona Lisa. Researchers have used various techniques, such as infrared reflectography and multispectral imaging, to uncover hidden details and insights about the painting. These studies have revealed that Leonardo da Vinci made significant changes to the composition of the artwork during its creation. For example, infrared reflectography has revealed that Leonardo originally painted the Mona Lisa with a larger format, including a larger background and additional elements. Through these discoveries, researchers have gained a deeper understanding of Leonardo’s creative process and the evolution of the Mona Lisa.
Mona Lisa’s Influence On Other Artists
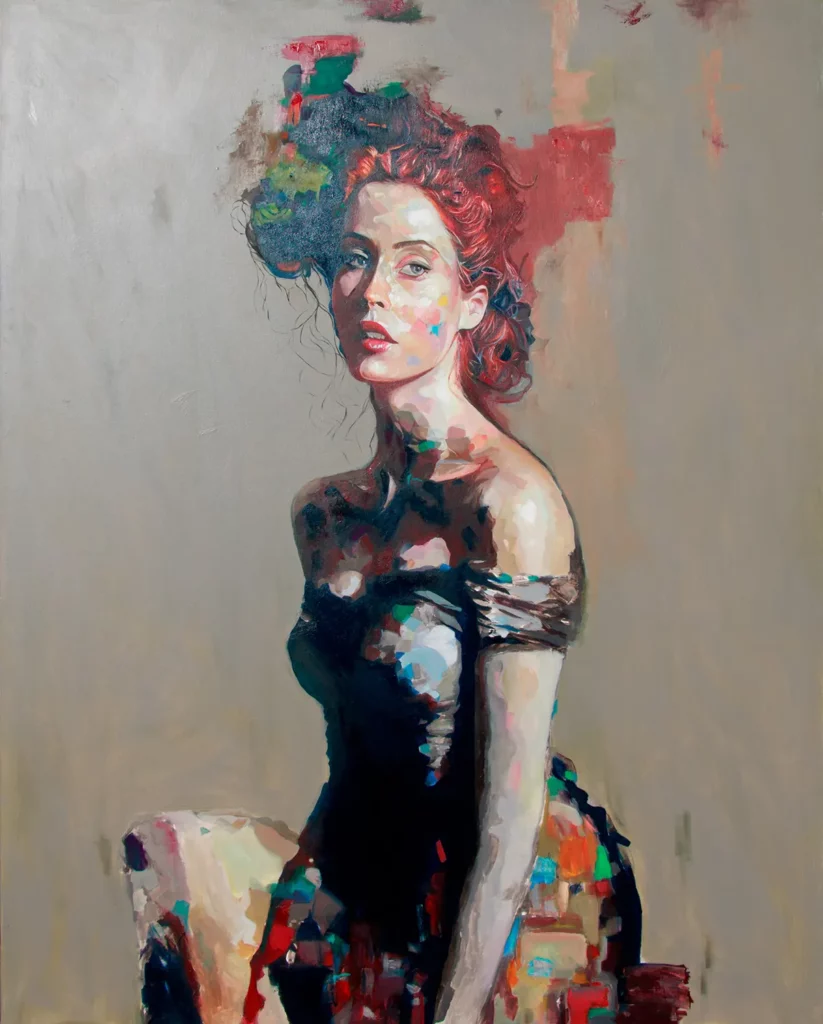
The image of the Mona Lisa has had a profound impact on the art world and has been a source of inspiration for numerous artists. One notable example is the artist Marcel Duchamp, who famously created a parody artwork titled “L.H.O.O.Q,” adding a mustache and goatee to a reproduction of the Mona Lisa. Duchamp’s work challenged the traditional notions of art and questioned the authority of iconic masterpieces.
Alex Righetto’s painting. Mona Lisa’s Daughter
In the contemporary art scene, Alex Righetto‘s Mona Lisa Daughter, stands as a testament to the evolving interpretations of iconic artworks. Drawing inspiration from the timeless allure of the Mona Lisa, Righetto presents a poignant juxtaposition of permanence and transience. The painting’s intricate balance between well-defined sections and intentionally unrefined gray areas mirrors the ancient Chinese philosophy of opposing yet interconnected forces in life. While the Mona Lisa’s enigmatic smile may be eternal, her daughter’s existence is fleeting, a powerful reminder of life’s impermanence.